โปรแกรมเคลียร์แผ่นซับหมึก L5290
เกี่ยวกับไฟล์นี้
ซอฟต์แวร์สำหรับ EPSON ECOTANK L5290 MULTIFUNCTIONAL PRINTER SETTINGS AND RESET
โปรแกรมที่มีไว้สำหรับการใช้งานทางเทคนิคในรุ่นที่มีกล่องบำรุงรักษาที่ไม่มีชิปเพื่อทำการปรับเปลี่ยนและรีเซ็ตแผ่นอิเล็กโทรดเมื่อเครื่องพิมพ์ปรากฏในข้อความสถานะ REQUIRED SERVICE, FILLED INK PADS หรือ PARTS ARE AT THE END OF LIFE
Link สำรอง Reset_Epson_L1210_L3210_L3250_L3251_L3260_L5290
วิธีการใช้โปรแกรมอยู่ด้านล่าง
ข้อมูลสำคัญ:
- คำสั่งรีเซ็ตจะแก้ไขข้อผิดพลาด / การแจ้งเตือนและช่วยให้คุณสามารถใช้เครื่องพิมพ์ได้อีกครั้งอย่างไรก็ตามขอแนะนำให้ทำการตรวจสอบ / บำรุงรักษาอุปกรณ์
- ปิดการใช้งานโปรแกรมป้องกันไวรัสและ windows defender ก่อนที่จะดาวน์โหลดและเรียกใช้ซอฟต์แวร์เนื่องจากบล็อกหากคุณไม่สามารถดาวน์โหลดได้ให้คลิกที่นี่
- ซอฟต์แวร์นี้ไม่สามารถแก้ปัญหาทางกายภาพเช่นข้อผิดพลาดทั่วไปข้อผิดพลาดของตลับหมึกกระดาษติดกระดาษติดเป็นต้น
ระบบปฏิบัติการ:
ซอฟต์แวร์นี้ได้รับการพัฒนาให้ทำงานบนระบบปฏิบัติการ Windows XP, 7, 8 และ 10, 11
ไม่ทำงานบน MAC หรือ Linux
ข้อความด้วยตนเอง:
- ตรวจสอบงานพิมพ์ในคิวลบหากคุณมีงานที่รอดำเนินการอยู่
- ปิดและเปิดเครื่องพิมพ์อีกครั้ง
- ปิดการใช้งานโปรแกรมป้องกันไวรัสและ Windows Defender;
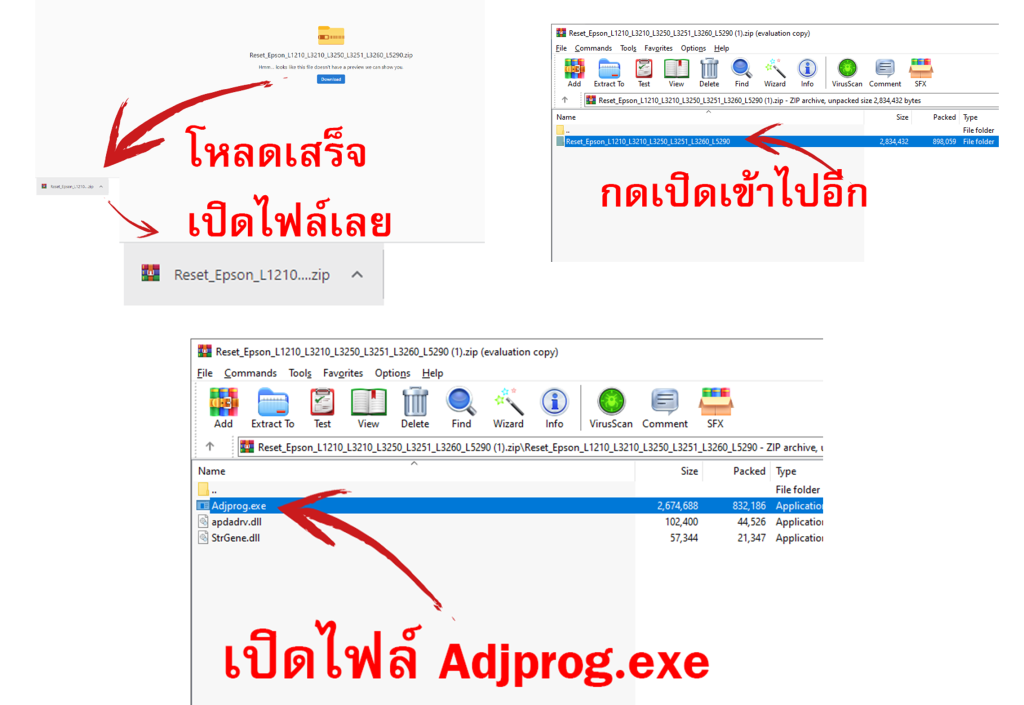
- ดาวน์โหลดซอฟต์แวร์และเรียกใช้งาน
- คลิก “ยอมรับ”;
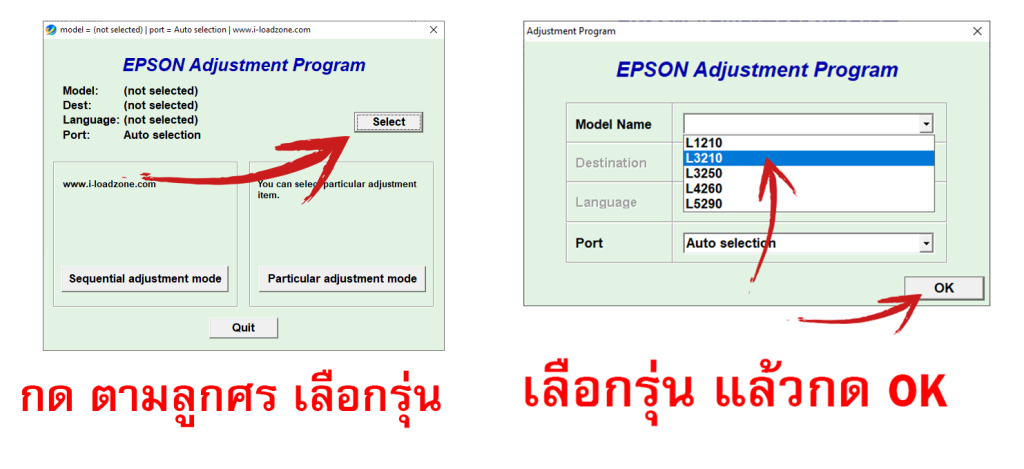
- คลิก “เลือก” เลือกรุ่น (ชื่อรุ่น) แล้วกดตกลง;
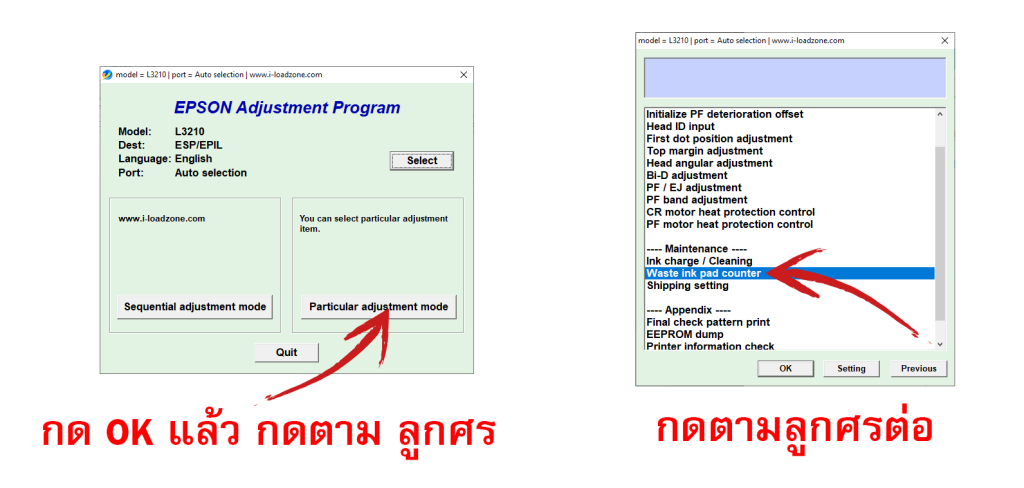
- คลิกที่ “โหมดการปรับค่าเฉพาะ”;
- คลิกที่ “Waste Ink Pad Counter”;
- ตรวจสอบ?ตัวเลือกที่มีอยู่;
- คลิกที่ “ตรวจสอบ” จำนวน / เปอร์เซ็นต์ควรปรากฏขึ้น
- ตรวจสอบ?ตัวเลือกที่พร้อมใช้งาน
- คลิกที่ “Initialization” ข้อความจะปรากฏขึ้นเพื่อดำเนินการต่อ / ปิดเครื่องพิมพ์
- ปิดและเปิดเครื่องพิมพ์อีกครั้งและคุณสามารถปิดซอฟต์แวร์ได้
- พร้อมรีเซ็ตเครื่องพิมพ์!
- ดูวิดีโอด้านล่างซึ่งอธิบายถึงทีละขั้นตอนหากคุณไม่สามารถทำตามขั้นตอนนี้ได้โปรดติดต่อเราเพื่อขอการสนับสนุนทางเทคนิคที่เราทำการเข้าถึงจากระยะไกลเพื่อตรวจสอบ
วิธีเคลียร์ ง่ายๆจากใจชาวเหนือ

1.โหลดไฟล์มาแล้ว ก็ กดเปิดโปรแกรมตามในภาพเลย

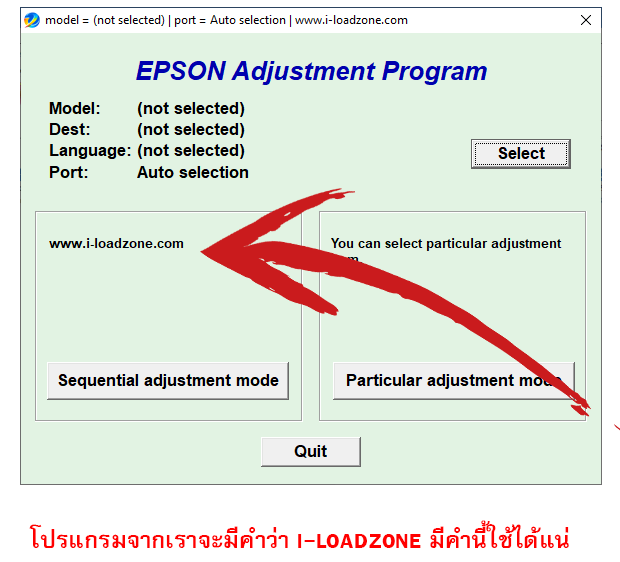
2. เปิดโปรแกรมแล้ว ให้สังเกตตามลูกศรชี้ แหล่งที่มาของโปรแกรม i-loadzone แจกฟรี crack โดย i-loadzone ตัดการลงทะเบียนออก พวกขอแท้จะมีลงทะเบียน โปรแกรม crack ไม่ต้องลงทะเบียน แจกให้ใช้ฟรีๆ

3. กด Select ตามในภาพ แล้วเลือกรุ่นให้ตรงกับเครื่องพิมพ์แล้วกด OK

4. จะกล้บมาหน้าจอแรก ให้เลือกตามลูกศรชี้ จะมาอีกหน้าเลือก Waste ink pad counter แล้ว กด OK

5.มาหน้านี้ให้ใส่เครื่องหมายถูก หน้า Main Pad Counter แล้ว กด initialzation ตรงนี้คือการสั่งเคลียร์

เคลียร์เสร็จปิดเครื่องพิมพ์เปิดใหม่ เท่านี้เรียบร้อย
About This File
SOFTWARE FOR EPSON ECOTANK L3110 MULTIFUNCTIONAL PRINTER SETTINGS AND RESET
Program intended for technical use, in the model that has the maintenance box without chip, to make adjustments and reset the pads, when the printer appears in the status REQUIRED SERVICE messages, FILLED INK PADS or PARTS ARE AT THE END OF LIFE.
IMPORTANT INFORMATIONS:
- The reset command resolves the error / alert and lets you use the printer again, however it is recommended to perform a review / maintenance on the equipment.
- Disable anti-virus and windows defender before downloading and running the software, as they block, if you are unable to download, click here.
- This software does not solve physical problems such as: general error, cartridge error, jams, jammed paper, etc.
OPERATIONAL SYSTEM:
This software is developed to work on Windows XP, 7, 8 and 10 Operating Systems.
It does not work on MAC or Linux.
MANUAL TEXT:
- Check the printouts in the queue, delete if you have any pending ones;
- Turn the printer off and on again;
- Disable anti-virus and windows defender;
- Download the software and run it;
- Click “Accept”;
- Click “Select”, select the model (Model Name) and the port (Port – USB: Printer model), and press OK;
- Click on “Particular Adjustment Mode”;
- Click on “Waste Ink Pad Counter”;
- Check ? the selection that is available;
- Click on “Check”, the count / percentage should appear.
- Check ? the selection that is available.
- Click on “Initialization”, a message should appear to continue / turn off the printer.
- Turn the printer off and on again, and you can close the software.
- Ready, printer reset!
- See the video below that explains the step-by-step, if you are unable to do the procedures please contact us requesting Technical Support that we do remote access to verify.
